I’m in Serbia right now, so I’m taking advantage of my time here to learn some new decorating techniques, Gumpaste Lily is something that I always wanted to learn how to make. I’ve spent a lot of time trying to find a good teacher and a program that works best for me, which can be a real challenge when you have a one-year-old, but one-on-one classes have worked out great. I was so happy when I finally found what I was looking for: the best teacher I could ever ask for!
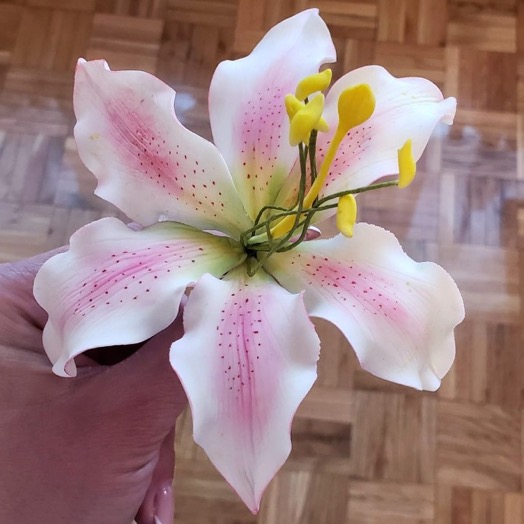
In the picture is my first ever Gumpaste Lily. That’s right, my first. Looks realistic, doesn’t it? That’s how good my teacher is! Don’t worry, though: it’s not as hard as it seems. As long as you follow the instructions carefully, it’s actually pretty easy!
Ready to make your own Gumpaste Lily? Here are the tools you’ll need:
- A Lily cutter
- 26/28cm floral wire and tape
- Silicone with a flower pattern
- Foam pads
- A fondant rolling pin
- A ball tool
- A paintbrush
- Powder food colors (yellow, green, and pink)
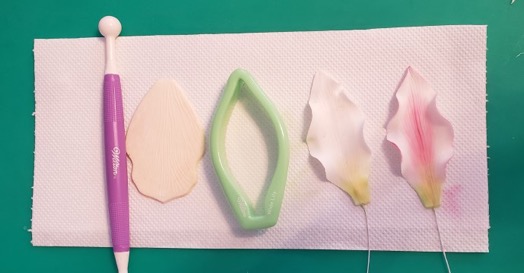
Ball tool, silicone with flower pattern, and Lily Cutter.
PETALS:
- Use the Lily Cutter to cut out 6 petals.
- Put each petal on the silicone and roll it with the rolling pin.
- Roll the edge of each petal with your ball tool. While rolling, half of the ball should be on the foam and the other half on the petal.
- Press a 6-inch wire all the way up the middle of each petal.
- Now to add some color! 🙂 Put a little bit of green powder on the tissue paper.
- Take a small amount with your paintbrush, making sure to shake off the excess powder.
- Paint the bottom of each petal with half the brush on the paper and half on the edge of the petal.
- Paint the inside of each petal in pink and yellow (see the image below). Again, make sure you don’t have too much powder on your brush!

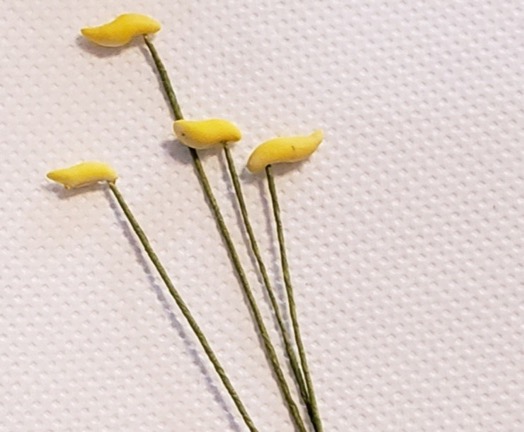
Now to make the inside of the flower. You’ll need 6 Stamens and one Pistil.
STAMENS:
- Prepare six 6-inch wires.
- Cover each one with dark green tape.
- Bend the top of each wire (5mm) at a 90-degree angle.
- Roll 6 small anthers out of gum paste.
- Bend the edges of an anther slightly, one up and the other down, then place it on the bend in a wire. Repeat for each anther.
PISTIL:
- Prepare one 6-inch wire.
- Make a 1-inch stem out of gum paste.
- Place the stem over the wire and roll the bottom, making sure not to disturb the top part.
- Make 3 dents on the top part of the stem.
- Paint the bottom with green powder and the rest with yellow powder.
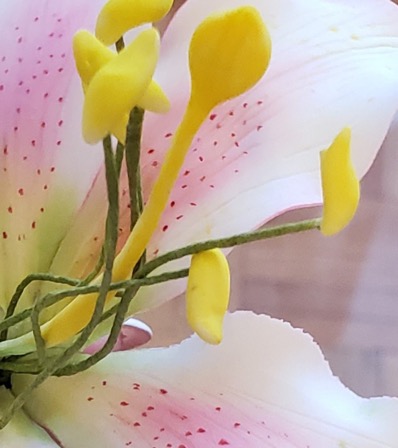
ASSEMBLY:
- Connect the stamens and pistil with green tape.
- Connect the petals to the stamens and pistil two at a time.
And that’s it! 🙂 You now have your very own Gumpaste Lily! Of course, this is just a rough explanation. I’ll try to make a video tutorial next time so you can see the process step by step. Until then, I hope these instructions were clear enough! Have fun making your own gum paste blossoms! 🙂